


Everybody knows how important backup is in today’s world, from your business and company data to your personal data, your contacts, emails, your holiday photos, even those secret grandma’s recipes. Backing up your personal data is a cheap and easy task nowadays, because cloud storage providers are competing to attract customers and so are constantly increasing their free and entry level offerings. It gets a bit trickier when it comes to protecting your business data, which will be the focus of this article.
Disaster Recovery (DR) is another way of protecting your data by creating replica of your production systems and data in a remote location that would enable business continuity in case of a disaster event at your primary location. In this case, disaster can be anything from natural disaster or hardware failure to (in recent years most common) human error and even cyber-attack. Again, most customers are aware that they need DR or already have DR implemented, but only small number are sure their DR is actually going to work. Very few do regular DR testing, and even fewer do it successfully.
There are already plenty of articles about backup and DR in general, so in this blog series, I’m going to focus on protecting your data in hybrid cloud scenarios using Azure Backup Server and Azure Site Recovery, with an emphasis on VMware vSphere as the on premise choice for virtualisation.
Part one: Azure Backup Server
Microsoft Azure Backup Server (MABS) can help you to back up your on premise data (both virtual and physical) to Azure for long-term retention (almost indefinite). In fact, MABS is a slightly different version of System Center Data Protection Manager (SC DPM) that does not need any license to run. It does not support tape backup and requires the existence of Azure Backup vault instead. You might be asking yourself: why would Microsoft give away an enterprise-grade product for free? Because you are paying for Azure Backup Vault storage (which could grow significantly, depending on your long-term backup strategy), plus Microsoft gets you a step closer to Azure and all the other shiny services it offers. Nevertheless, the value for money is excellent.
MABS supports VMs running on both Hyper-V and VMware, physical servers and PCs, plus top-of-the-line application-aware backup for SQL, SharePoint and Exchange. VM backup is snapshot based (i.e. agentless), while physical and application aware requires the backup agent to be deployed first. Short-term backup is stored on the MABS server (i.e. whatever storage you have attached to the server and is visible in disk management). That local storage must be at least 1.5 times the size of the data being protected. That data is then forwarded to Azure for long-term protection, depending on your protection policy. MABS supports up to 9999 protection points in Azure at the moment, meaning you never have to worry about your retention policy again. As an example, its default values are: 180 daily, 104 weekly, 60 monthly and 10 yearly backups! And that is only 354 protection points out of 9999! That’s what I mean by “almost indefinite” long-term retention. Centralised management and reporting, plus email alerts are standard options for any backup software, MABS included.
All you need to get started is a current Azure subscription and Azure Recovery Services vault.
Planning
I can’t emphasise enough how important this phase is for any backup considerations. First, you need to assess your company’s or your client’s backup requirements in terms of:
- what to back up
- when to back up
- how often
- what backup retention to choose
- how to recover
- how quickly you can do it.
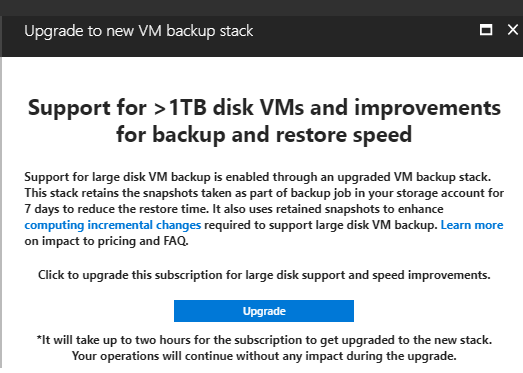
Once you have your backup strategy in place, check out the MABS protection matrix to see which workloads are supported, and what MABS and Recover Services vault limitations exist. Keep in mind that the limitations change frequently, like everything else cloud-related. A perfect example is a recent change in backup support for large disks (instead of only 1 TB, they now support up to 4 TB), so that’s one of the first things you should do with your Azure subscription before starting any backup related activities.
You’ll need to estimate your storage requirements for short-term on premise protection, as well as whether your storage type in Azure is locally or geo-redundant. Once you have all those details documented in your backup design, it’s time to move to the next phase.
Installation
Like any other Microsoft product, the setup process is well-documented and easy to follow. It’s not in-depth, but enough for basic setup. (For more complex and scale out deployments, I strongly recommend talking to one of our experts.)
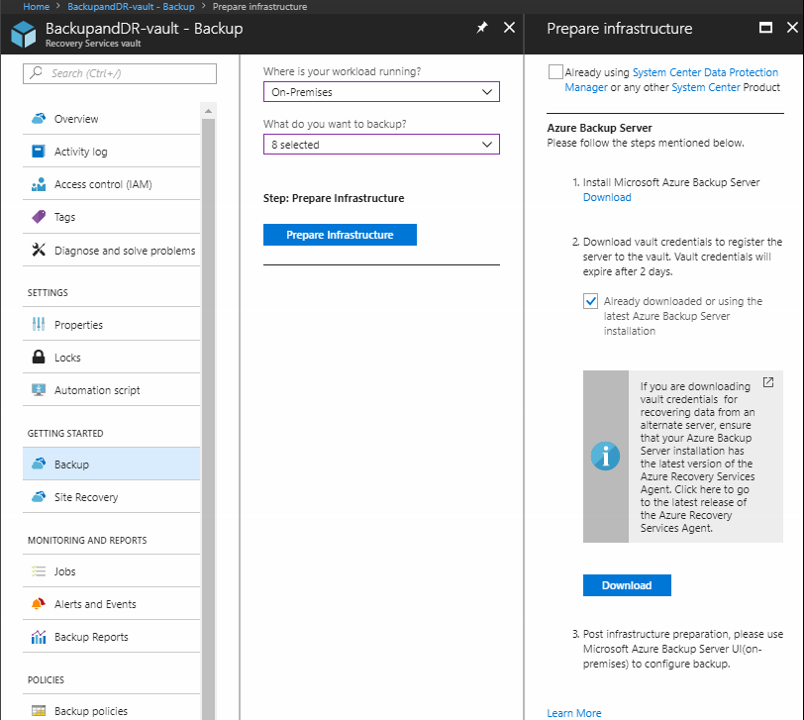
After you create your Recovery Services vault in Azure and instruct it where your workload is running (e.g. Azure, On-Premises) and what you want to backup (following choices available: Files and folders, Hyper-V Virtual Machines, VMware Virtual Machines, SQL, SharePoint, Exchange, System State, Bare Metal Recovery), it’s time to download and install MABS.
You can install MABS on a physical server (apparently they still exist?!), but I don’t see why would anyone do that in this day and age, with all the flexibility and advantage of the virtual machine.
Installation is really straightforward (one of those next-next-finish types) and I will not go through all the steps, which are well documented here. Before you start, make sure your server is joined to a domain, or you won’t be able to continue. The setup process will do all the prerequisite checks and install any missing Windows components. It will also install SQL 2016 SP if you don’t have an existing one (needs to be 2014 SP1 or higher).
You need the available space of at least 5% of the data being backed up to cloud for Scratch Location (temporary cache on MABS). Keep in mind the space needed for Staging Area (temporary location to download files from Azure when doing a restore). The size will depend on the size of the VM you are restoring.
During installation, you’ll be prompted to register your MABS with the Recovery Services vault, using the vault credentials that you downloaded earlier. Here, you’ll generate passphrase that is used to encrypt and decrypt your backup data. You must store this passphrase in a safe location, because if you lose it, the data can’t be recovered because Microsoft doesn’t save or manage it. If you want to make use of RBAC on premise and in Azure (which you should) and have dedicated user for backup operations, your Azure backup user needs to have “Backup Contributor” permissions on your Recovery Services vault.
Configuration
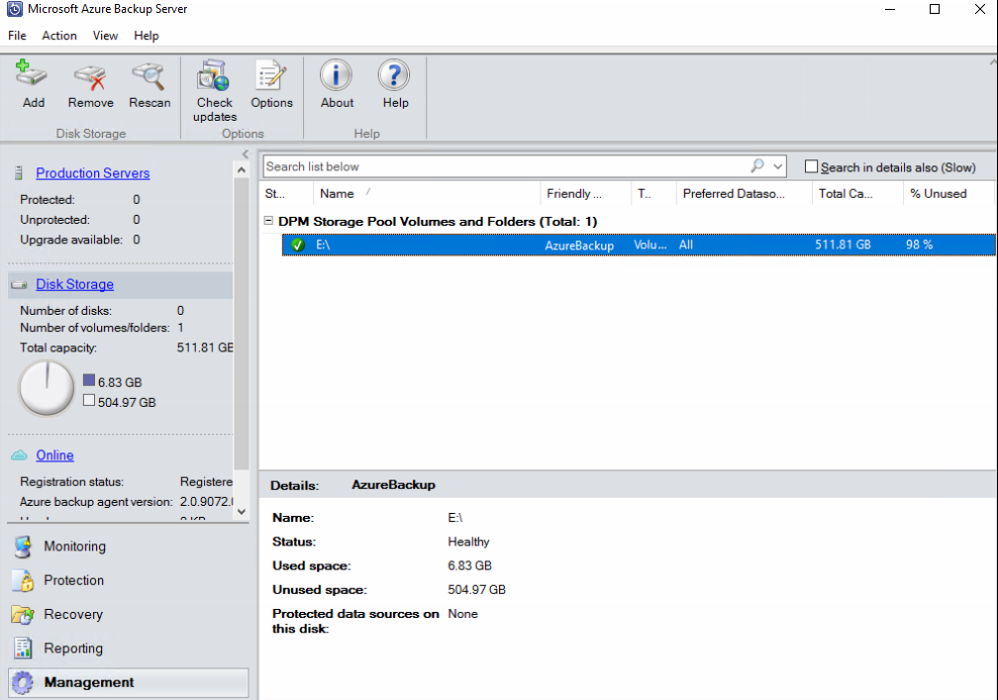
After installation, start your management console and see that it looks exactly the same as DPM management console (once again, same product, different name):
Storage
Now comes the interesting part: adding storage to your MABS. If you installed your MABS on Windows Server 2016, then you can take advantage of so called Modern Backup Storage, which according to Microsoft, “offers storage savings of 50 percent, backups that are three times faster, and more efficient storage”. If you run MABS on an earlier version of Windows Server, you’re out of luck.
Modern Backup Storage (I wonder who comes up with these names at Microsoft) has another interesting feature: workload-aware storage. Say you have different types of storage attached to your MABS. You can group them in volumes according to speed and IOPS and set them to automatically store only certain types of workloads, e.g. set expensive, high IOPS volumes for frequent, high volume backups (like SQL) and low-cost volumes for VM backups. We do this with simple PowerShell commands:
$volumes = Get-DPMDiskStorage -DPMServerName <server_name> -Volumes
Update-DPMDiskStorage -Volume $volumes[0] -DatasourceType VMware
The result is following: you will see VMware VMs under “Proffered datasource types” and MABS will automatically place your VMware backups on this volume:
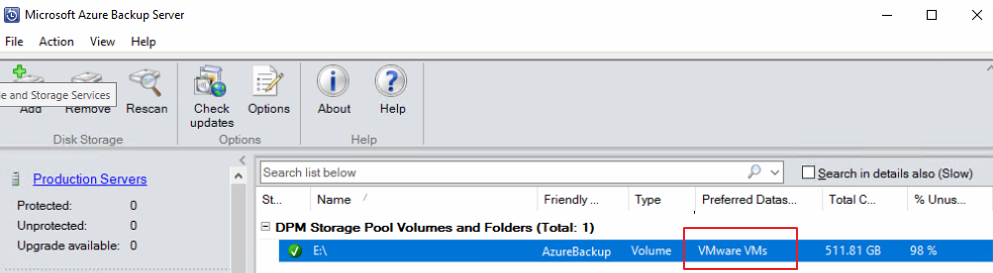
VMware
Since we’re focusing on backing up VMware workloads with MABS, it’s time to connect your vCenter.
At the time of writing this post, MABS supports VMware vCenter Server versions 6.5, 6.0 and 5.5. By default, MABS is trying to communicate with vCenter using secure channel which requires you to download and install the VMware CA certificate on backup server. If you don’t require secure communication (not recommended), you can add following registry key to your backup server:
Windows Registry Editor Version 5.00
[HKEY_LOCAL_MACHINE\SOFTWARE\Microsoft\Microsoft Data Protection Manager\VMWare]
"IgnoreCertificateValidation"=dword:00000001
We recommend creating a new role and user account on the vCenter (you can use the default admin for testing purposes) and adding vCenter to MABS using those credentials.
Protection Groups
Now that you have storage for your backups and an established connection to your vCenter, it’s time to protect your workloads. You do this by creating Protection Groups and selecting workloads that you want to backup.
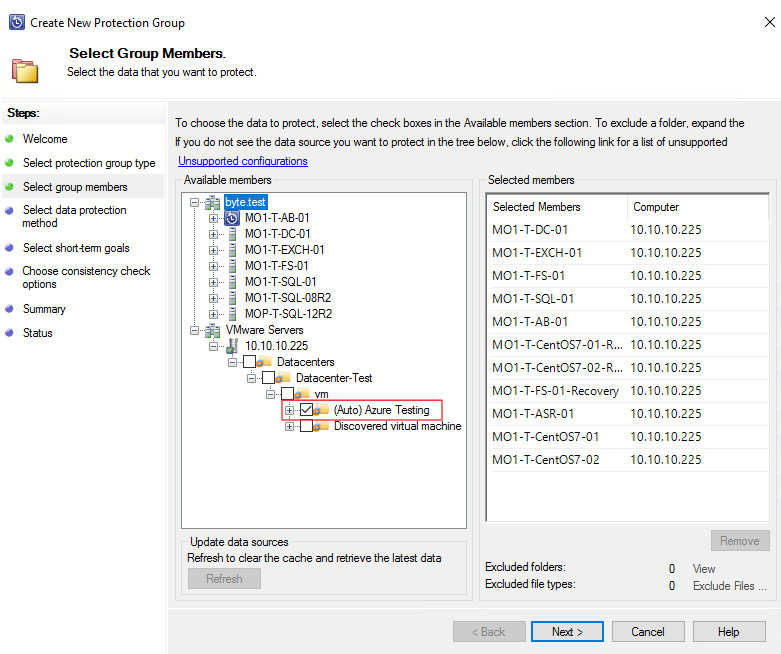
If all the VMs you want to protect are in the same VM Folder, you can just select that folder and all your VMs will be added to the Protection Group automatically. Not only that, any VMs you add to that folder in the future will be auto-protected as well (see Auto prefix in the screenshot above). Therefore, your backup strategy might include creating VM folders to align with your Protection Groups and then just adding new VMs to appropriate folders (easily scripted) will take care of your backup requirements automatically.
Remember, for VMware VM backups, you don’t need to deploy protection agents, because they are snapshot-based. These backups even allow for File Level Recovery, so you’re covered from losing the entire VM as well losing single file.
For any other type of backup, you need to deploy protection agents first. You can deploy these from MABS console, manually or scripted. For large deployments, you need to use a scripted one or a software deployment tool (like SCCM). Bear in mind what the prerequisites are for agent deployment, because if you need to protect hundreds of production servers and they are running Windows Server 2008 R2, there’s a good chance you have to deploy WMF 4.0 beforehand, which means rebooting all those servers, so plan carefully.
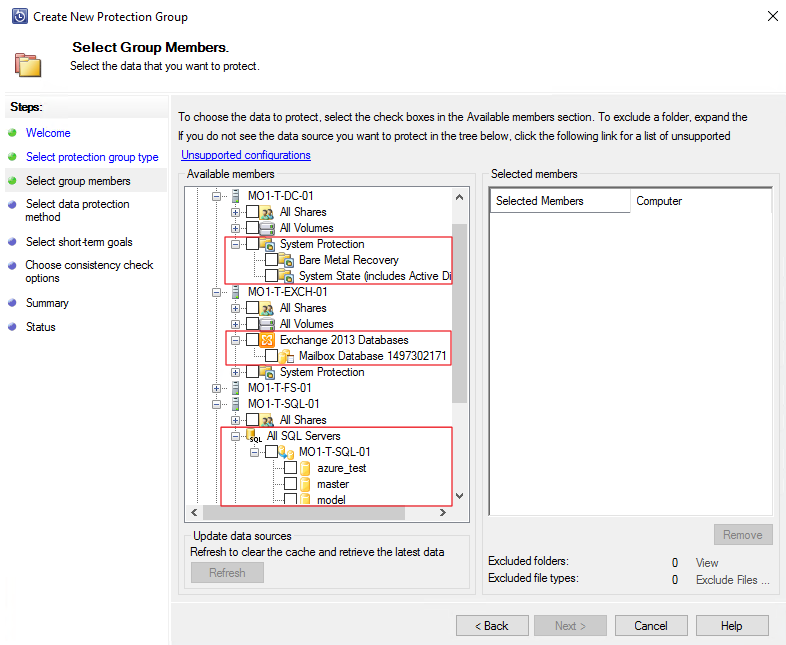
Once you have successfully installed protection agents to your servers, MABS will “become aware” of the certain workloads running on them and you are able to select/add these application-specific items to your Protection Groups: SQL Databases, Exchange Mailbox Databases, SharePoint farms and System State/Bare Metal Recovery. Be aware of the specific requirements and permissions for each of these backup types (see screenshot below).
All that’s left to configure is:
- when you want to create recovery point
- how long to keep on premise backups
- what to send to Azure (enable online protection)
- how long to keep backups in Azure
- how to perform initial backup to Azure (over the network or data import)
There is a step-by-step guide for each of the supported workloads: VMware, Exchange, SharePoint, SQL, System state and bare metal recovery.
Other considerations
Depending on your existing infrastructure, you may need to configure firewall exceptions and add antivirus exclusions on both the backup server and protected servers.
If your network bandwidth is limited, you can throttle network traffic between MABS and each of the protected servers, as well as between MABS and Azure. You can do this by defining bandwidth limit during work hours/days and non-work hours/days. For large deployments, it’s recommended that you isolate backup traffic on a completely separate network. This requires a little bit more complicated configuration and additional network cards on MABS and protected servers.
Conclusion
Microsoft Azure Backup Server is an easy-to-deploy enterprise-level backup product that protects your on premise environment, both physical and virtual, and stores your backups in the cloud for long-term retention. In other words, it‘ll help you get rid of the slow and ancient tape backups while still preserving compliance for off-site backups. And did I mention, it comes at minimum cost? All you have to pay for is protected instance charges and backup blob storage. For detailed pricing information, see Azure calculator.
All in all, this backup product is well worth considering, especially if you’re already invested in Microsoft ecosystem and planning to use Microsoft Azure as your cloud platform of choice.
If you don’t have necessary skills or resources in your company to install it, contact us at info@byte.com.au, or give us a call at +61 3 9828 9999 and our team will be delighted to assist with your backup needs.
Microsoft Infrastructure and Cloud Subject Matter Expert
Enabling digital transformation using the best of Microsoft and Citrix technologies with strong focus on Cloud.